In this post, I want to share with you a cool Google Ads trick that will save you lots of time and boost engagement on all of your responsive search ads. No matter your PPC experience, this may just give you that little edge over your competitor that you’ve been desperately searching for.
I will be showing you how to use ad customizers in order to dynamically insert the location of the user into the ad headline and ad text. If you’re a Google Ads marketer, then this is just one of those tricks that you should learn to apply, as there are a plethora of cases where this dynamic keyword insertion can work to improve ad relevance and boost the performance of your ad groups.
What is dynamic location insertion?
Ad customizers enable the possibility to modify ad content in real-time, using dynamic ads and the insertion of target keywords. This means that the exact content of your responsive search ad is only determined at the moment the ad is served, providing a way to tailor your ad to the individual user and making it hyper-relevant. The broad match keywords and default text can be changed to multiple keywords, using the same ad and maximizing the character limit.
It is possible to do this as Google can quite accurately determine a user's location by tracking their IP address using GPS, Wi-Fi, Bluetooth or cell towers. Via customizers, it enables advertisers to use this information to their advantage in their ads.
What advantages does it bring?
The ability to insert the location of the searcher into the ad, this brings along plenty of advantages.
Firstly, it makes the ad feel more relevant and personalized and is advantageous to use when executing responsive search ad text and dynamic keyword insertion work. This is quite similar to email automation practices, where variables such as [FIRST NAME] are inserted into the ad copy, making the searcher's query feel like the message is personally written for him or her.
The second advantage is that this level of customization can be done at scale. While normally, the geographic region can only be determined at the campaign level settings, dynamic location insertion can align the geo-targeting instantly with the ad content. It's like setting up a ton of mini-campaigns, all built around targeting a specific location (but then all in one campaign).
Dynamic location insertion matches well with some important trends in contemporary PPC, such as the rise of “near me” queries. Users are frequently making searches involving their location by adding the location in the query and expect the search results to reflect that. This trend has been on a steep rise since 2013, and more and more users expect that their search results reflect their physical location. This is also a reason why Google has been putting so much emphasis on local inventory ads and local campaigns in 2020, for example by launching promoted pins.
How do you set it up?
In this video, I provided a walk-through on how to do the set-up:
The first thing we need to do is to get the list of locations that Google can identify. This list can be found on the official Google Ads developer portal.
Download the most recent file.
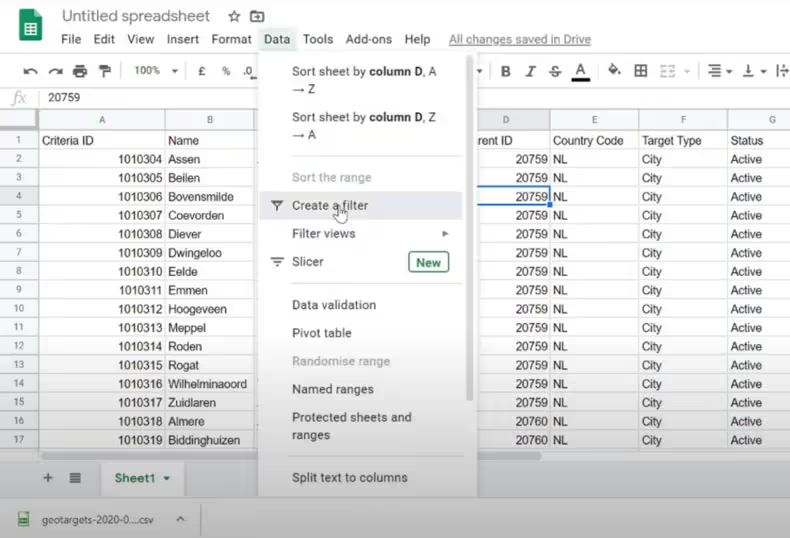
After that, we need to edit this file in a spreadsheet editor like Excel, Open Office or Google Sheets and apply the first filter. It is important to create a filter right away since the file is quite large and it can slow down the computer.

Commonly, the first step would be to filter out the country, but it is also possible to filter out specific regions or points of interest, such as airports, in a worldwide targeted campaign. The filter option can typically be found under the "data" tab. After applying it, you can copy and "paste values only" to a new spreadsheet file, which will become your location data file.
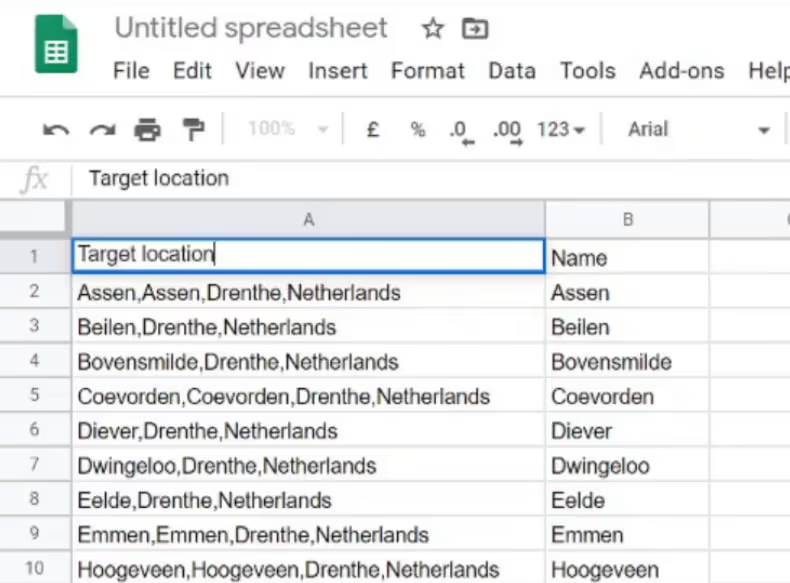
The next step is to rename the columns. The canonical name can be used as a targeting attribute. This column needs to be named "target location".

The shortened location name is generally used for the ad content. This column can be named how you want to identify it in the future. Ideally, the name is short but descriptive, such as "city name".
All other columns can now be removed and your data file is ready to be used. You should have 2 columns, one with the name "target location" and one with the shortened location name you want to insert to ads.
It is useful to check the lengths of the location names, as some can be quite long and may need to be shortened. They should definitely not exceed 30 characters, and if you plan to use other ad copy as well, you need to take it into account.
For example, if we want to use the headline "In [location]", our location names can't exceed 27 characters. In order to check the text length, we can create a new column which contains the formula "=LEN()" to count the number of characters. (Discover other PPC formulas for Google Sheets).
The file is now finished, now we need to save the spreadsheet as a .csv file.
Now we can upload this file in Google Ads under Business Data.

After the file has been uploaded, we can call the values by using the curly brackets while writing the ad copy. Start with the opening bracket, select "Ad customizer", select the uploaded file and select the location name column that you specified for the ad content. We can use these in the Headlines, the Descriptions or in the Display URL (Paths).

Mistakes to avoid
There can always be cases where the location of the user couldn't be properly matched with the dynamic ad. For that reason, it is very important to have a regular ad in the ad group as well, which acts as a back-up or "fallback" ad in case the dynamic ad couldn't be loaded.
This fallback text may also be specified inside the ad text of the dynamic ad, by using the column sign ":" before the closing bracket.
Even though ad customizers can be set up in the Google Ads Editor, I would recommend to set it up within the regular Google Ads interface, since it allows you to easily select the feed and columns and has a clear ad preview to spot any errors.
Conclusion
Dynamic location insertion ads are not very difficult to set up but can provide useful benefits to advertisers that benefit from local intent search queries. In this guide, we have covered the basic set up but there are many other creative usage options to explore.
Hopefully, this guide has given you the foundations on how to set everything up. Now it's your turn to try this on your ads and see what other uses you can think up!
Say goodbye to wasted ad spend
Discover how Lunio can help you eliminate invalid ad clicks and maximize paid media performance


.png)


